How to configure backup to Google Drive or any cloud storage that supports the WebDAV protocol
It is common knowledge that a really reliable backup strategy means that backups are stored at a remote location. Of course, you can simply keep your backups on a separate hard drive. But what if it is stolen, damaged in fire or otherwise effectively lost?
Some time ago, keeping your backups at a remote location required a lot of additional efforts and/or expenses, so this backup strategy was only used for critical data. But recently the situation has changed dramatically thanks to cloud storage services.
Now anyone can do remote backups at very little expenses or even for free. A typical cloud storage offers 5–15 GB of disk space for free, which is often quite sufficient to back up important data. If you need more disk space you can have it for very little money. For example, Google Drive offers 100 GB for $2 per month and 1 TB for $10 per month.
You can do backups using a client application provided by the cloud service. This backup method is very simple, but it has some limitations. First, the main purpose of a cloud service is to synchronize files between different devices, so its client application tries to transfer any changed files to the server as fast as possible. Such behavior is not very reasonable when doing backup and your internet connection may be temporarily clogged. It is much better to back up any changed files on a regular basis, for example each night. Secondly, your files are copied to the cloud storage as is, unencrypted — that’s the main problem, as you run the risk of a third party gaining access to them. For many people this is absolutely unacceptable. Besides, the client application provided by the cloud service requires that you keep all files in one folder (or its subfolders), which is synchronized to the cloud storage. This condition is often inconvenient as it doesn’t allow you to keep the files you work with in their usual places.
That’s why we have developed @MAX SyncUp, a special application that helps you back up your files while avoiding the above limitations. Now you can back up files to Google Drive or other cloud storage that supports the WebDAV protocol (Box.com, OpenDrive.com, Disk.Yandex.com, etc.). Moreover, you don’t even need to install and use the client application provided by the respective cloud service.
You don’t use Google Drive? No problem! Just create a Google account and then use Google Drive to do the secure backup for free. If you already use Google Drive, create another Google account specially for backups or allocate a folder in your main account (please, disable that folder’s synchronization by Google Drive’s client application).
Here’s how this backup strategy works. When you do a backup for the first time an encrypted archive (either of our proprietary format or a standard Zip file) is created in the cloud storage. This archive contains all the files that you have selected for the backup. This is a “full” backup. You can do it once or on a regular basis.
After that, each time you do a backup, a new encrypted archive is created in the cloud storage. This archive contains all the files that have changed after the previous backup. This is an “incremental” backup, which will be kept for some time (you can specify for how long), and then deleted. @MAX SyncUp lets you easily restore the latest versions of files or versions at a specific date (if the incremental backup containing them has not expired) without going into technical details.
Backups are done according to the schedule that you have set. You can choose a convenient time for doing backups and set a backup period. Your archives in the cloud are encrypted, so you can be absolutely sure that your data are safe from prying eyes. And, of course, you can back up files regardless of their specific location, so you don’t have to change your habits!
As an example, let’s configure a secure remote backup to Google Drive or any cloud storage that supports the WebDAV protocol using @MAX SyncUp:
-
Run @MAX SyncUp.
-
In the File menu select New profile.
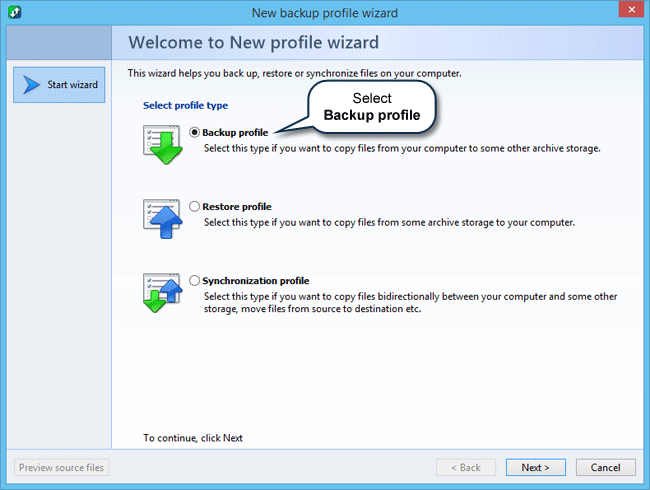
The New profile wizard will open. On the first tab you need to select a profile type.
-
Select Backup profile, and then click Next.
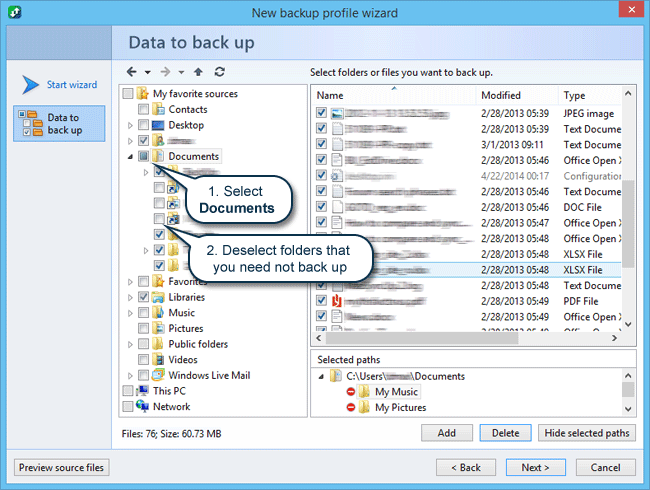
When the next tab opens specify the folder containing the files to back up.
-
In the folders list check the Documents folder as the input folder and uncheck those subfolders that you don’t need to back up. Then click Next.
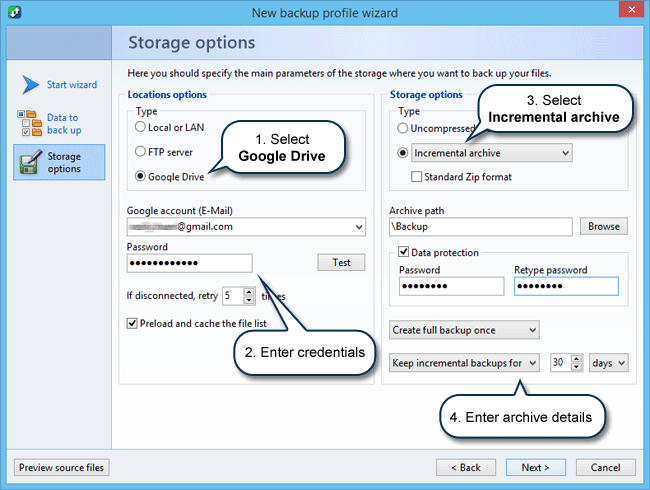
Another tab will open with cloud storage and archive settings.
-
Select the Location type (Google Drive or WebDAV server depending on which cloud storage you will be using), and enter your account details. If you are going to use the WebDAV protocol to access to the cloud storage you need to find out the server’s address. Here are some examples:
Box.com – https://dav.box.com/dav
OpenDrive.com – https://webdav.opendrive.com/
Yandex Disk – https://webdav.yandex.com или https://webdav.yandex.ru
If you are using a different cloud service you can probably find its WebDAV server’s address in the service’s user documentation.
Select Incremental archive as the Storage type, specify the path for storing your archives and set a password. You can optionally use the standard Zip format for full and incremental archives. You can also set the “depth” (the number of copies to keep) for incremental archives and the period for re-creating a full archive. Click Next to continue.
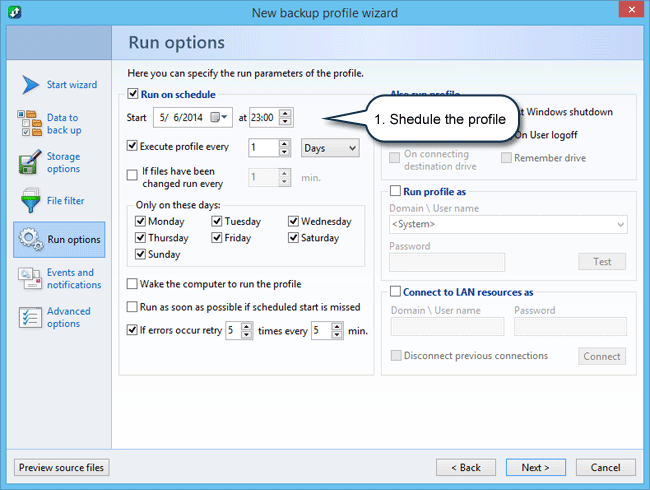
Another tab will open where you can define the backup profile launch parameters. You can set a profile-launch schedule (time and period), or define a trigger event. You can also configure other profile-launch parameters.
-
Schedule the profile and then click Next.
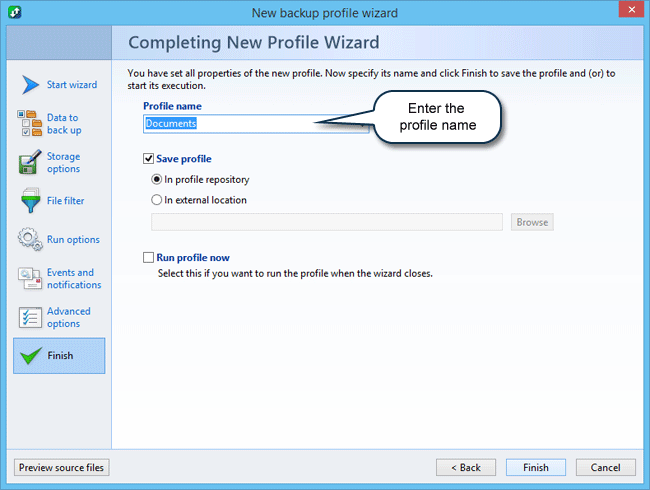
The last tab will open for naming the profile.
-
Enter the profile name.
The New profile wizard includes three additional tabs which you can open by click the respective button. These are:
File filter on which you can add filters to include (or exclude) the determined files to be (or not to be) backed up;
Events and Notifications on which you can set the launch of other programs before and after the profile executing, e-mail notifications concerning the profile executing and others;
Advanced options on which you can specify the additional profile parameters.
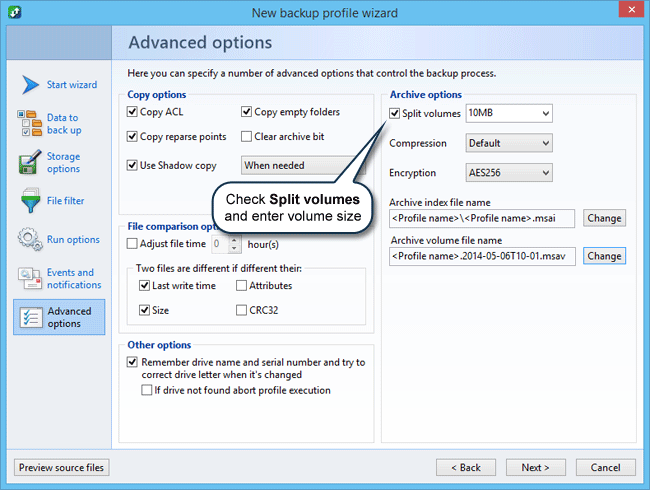
If your Internet channel is not quite reliable (that’s in most cases) we recommend doing else one setting: to split the archives into the volumes of moderate size, for example, 10 MB. This decreases the volume of data which re-transferred over a network in case of connection breakdown. It is very important when connecting through WebDAV protocol.
-
Click the Advanced options tab, check the Split volumes option and enter «10 MB» in the field. Then return on the Finish tab and click the Finish button to save the profile.
Congratulations, you have successfully created a backup profile! Now @MAX SyncUp will be doing backups automatically according to the schedule or you can launch a backup profile manually.


