How to set up direct synchronization of computers over
the Internet without any cloud storage
- synchronize computers over the Internet directly without any cloud storage
- transfer only the changed parts of files by using RSync-like algorithm
- compress and encrypt the transferred data
Most likely anyone working using more than one computer has to deal with data synchronization to keep the data actual. For example, one may need to have copies of work files on the home computer as well as on the laptop used during business trips. In that case, it is crucial changes made on one PC are timely reflected onto another.
Today different cloud storage services, like Dropbox, are typically used to solve this problem. However, such a way of synchronization, in spite of its unquestionable advantages, still has its drawbacks. Firstly, any cloud storage provider puts limitations on the maximum amount of stored and synchronized information. The free volume is usually insufficient, while additional storage space requires recurring payments. Secondly, many users value privacy of information very highly, but with cloud storage, there is always a risk of unauthorized access to your data by third parties. Recent high-profile exposures have confirmed these concerns. In addition, cloud service synchronization speeds depend not only on the bandwidth of your Internet connection, but also on the capacity of the infrastructure of this service. Previous experiences have showed that even major service providers cannot guarantee maximum speed all the time.
Avoiding the above mentioned problems is possible via direct synchronization over the Internet without using any third-party services as mediators. In this case, the synchronization performance is only limited by the bandwidth of your own connection, the data is never transferred to any third parties, and there are no recurring fees or data volume limitations. It is this way of synchronizing your data that @MAX SyncUp, a powerful synchronization and backup utility, offers to you.
Moreover, one of the key advantages of direct synchronization using @MAX SyncUp is that it uses a special algorithm to minimize the amount of data transferred via the network. The essence of this method is that if the accepting computer has the previous version of the transferred file, the program selects and transfers only those parts of the file that were actually changed. This drastically speeds up synchronization of large files with relatively small changes. Such an algorithm has been already proven thanks to the console app, RSync, for UNIX systems, but in @MAX SyncUp, it was amended by an up-to-date and convenient graphical interface.
How does this work? First, you should install @MAX SyncUp on both computers you want to synchronize. One of them is then set up as a SyncUp-server. The criteria for choosing a computer for the SyncUp-server role are as follows: it must be on all of the time when synchronization might be required; the internet provider it uses should provide a public IP address (a dynamic IP is also acceptable); it is also recommended that the router used to access to the Internet support UPnP protocol to avoid manual configuration. Usually, any home PC fits these requirements.
You can set up the SyncUp server easily with a specialized convenient setup wizard that activates upon the initial launch of the program.
-
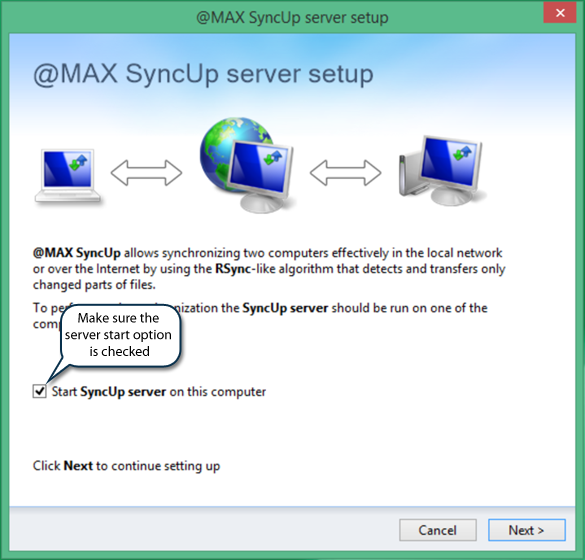
On the wizard start tab make sure the server start option is checked and click Next.
-
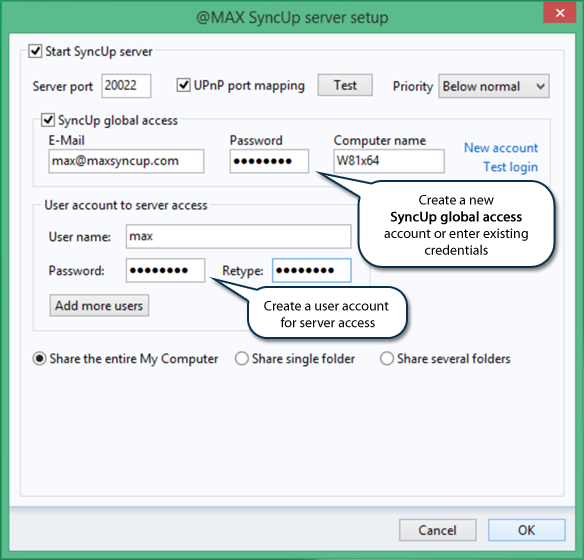
Check and, if it is necessary, change the port used for connection with the server, set up UPnP for automatic configuring of the Port mapping on your router and then test Internet connection. If your Internet-provider provides the dynamic IP-address check SyncUp global access – the some analogue of DynDNS that allows you to connect to the server with a dynamic IP address. Create a new user account or use an existing one. Then you should create one or several user accounts for access to this server. Moreover, you can restrict access to the server file system. You may only provide access to one or several folders on the server and also set up the personal folder for each user who only has access to this folder. For that you should specify the name of user folder in the each user account and use the template <User Folder> when specifying the local path. After that, press OK to save the changes.
This opens the tab where you should set up the SyncUp server parameters.
Then the second computer should be set up as a client which is connected up to the SyncUp server.
-
For that select New profile in the File menu.
-
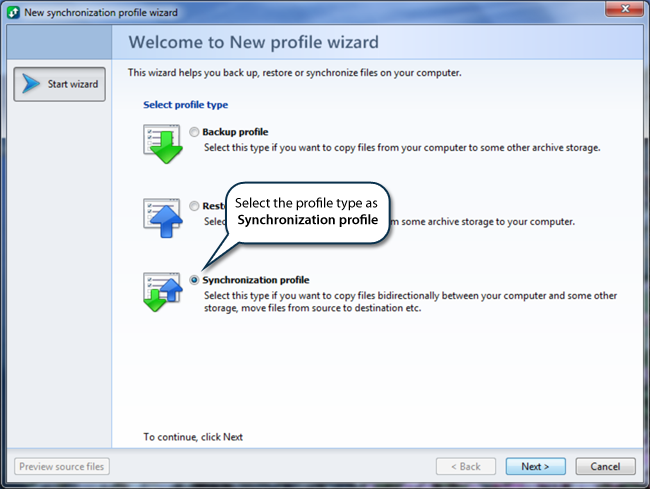
Select Synchronization profile and click Next.
-
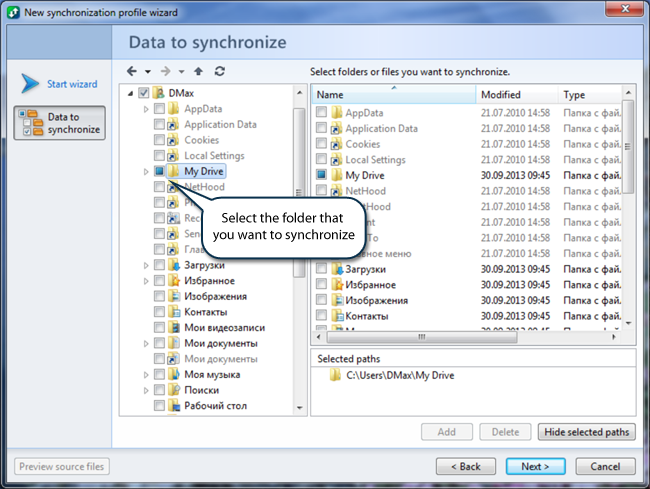
Find and select the folders which you want to synchronize and then click Next.
-
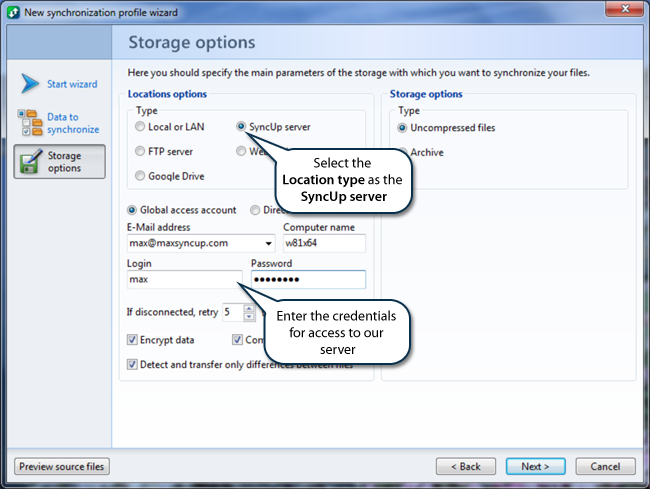
Select the location type as SyncUp server and enter the credentials, make sure the storage type is marked as Uncompressed files and then click Next.
-
Specify the target folder on the server (use the button Browse) and then click Next.
-
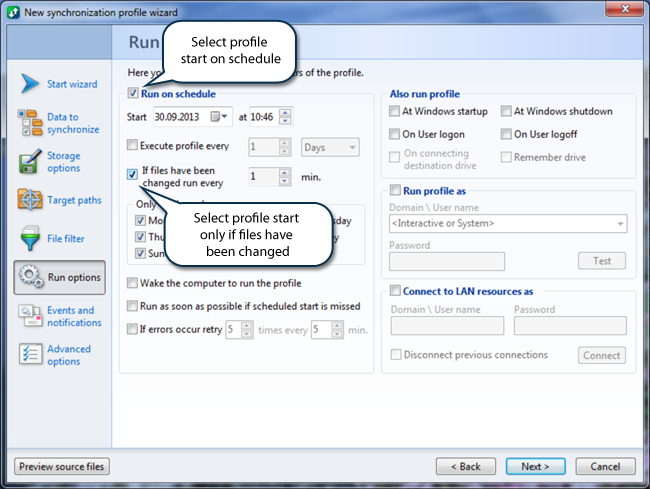
Check Run on schedule and then If files have been changed run every 1 min. If it is necessary you can increase the minimal time between synchronization processes. Then click Next.
-
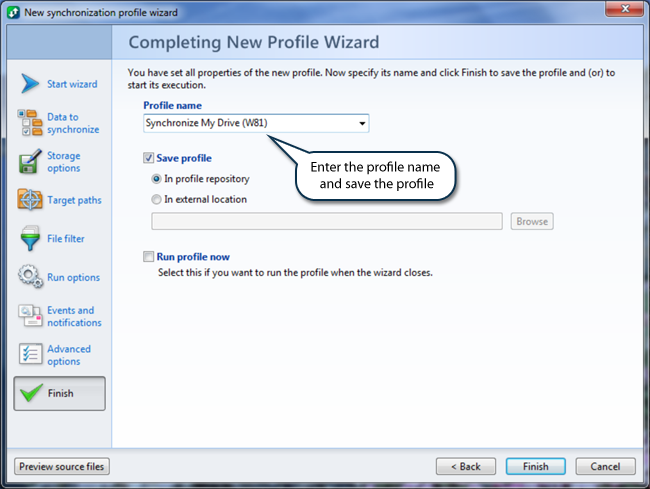
Enter the profile name and click Finish.
This opens the New profile wizard. On the first tab you should select the profile type.
Then the next tab opens where you should choose one or several folders to synchronize.
The next tab is intended to set up location options, storage options and other options for the second synchronization side.
On the next tab the path to the target folders should be specified.

The next tab is for setting up of profile.
Usually it suits for users if synchronization starts automatically when changing files. @MAX SyncUp can work in such mode. It monitors changes in the synchronized folders locally as well as on the server side and only executes synchronization when it is required. This minimizes the time the data stays in the unsynchronized state with no additional costs.
On the last tab you should name the profile.
That’s all! Now all files in the specified folders will be automatically synchronized with your files on the server.