Quick restore wizard
@MAX SyncUp provides the Quick restore wizard that offers you an easy way to restore files from the backup that you created earlier.
You can run the wizard for the selected profile
by clicking the Restore  on
the toolbar or by selecting the menu command Restore in
the main window.
on
the toolbar or by selecting the menu command Restore in
the main window.
The wizard window consists of several tabs:
In addition, it contains a few common buttons.
| Next > | Opens the next wizard tab. |
| < Back | Opens the previous wizard tab. |
| Cancel | Cancels the changes and closes the wizard window. |
| Restore | Closes the wizard window and starts the restore process. |
| Preview source files | Opens the Source file preview window. |
Data to restore tab
This tab lets you select files and folders to be restored.
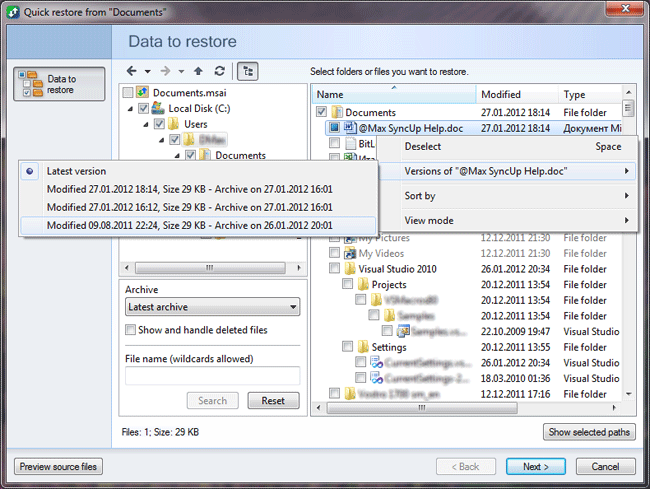
The tab consists of three areas: folder tree, file viewer and the area that displays a full path of selected folders and files (hidden by default).
 Back Back |
Navigates back. |
 Forward Forward |
Navigates forward. |
 Up Up |
Navigates up. |
 Refresh Refresh |
Refreshes folders and files. |
 View
all subfolders View
all subfolders |
If selected, this option allows you to view the content of the current folder and all its subfolders in the list of files. |
| Archive | Allows you to select the date of the archive and thus to restore the files on that date. It can also be done using the menu item Versions of ... on the popup menu. |
| Show and handle deleted files | If checked, allows you to select and restore deleted files. |
| File name | Allows you to specify a wildcard to search for files. |
| Search | Starts searching for files. |
| Reset | Cancels a file search. |
File filter tab
This tab lets you edit filters for including or excluding specific file types to be restored.
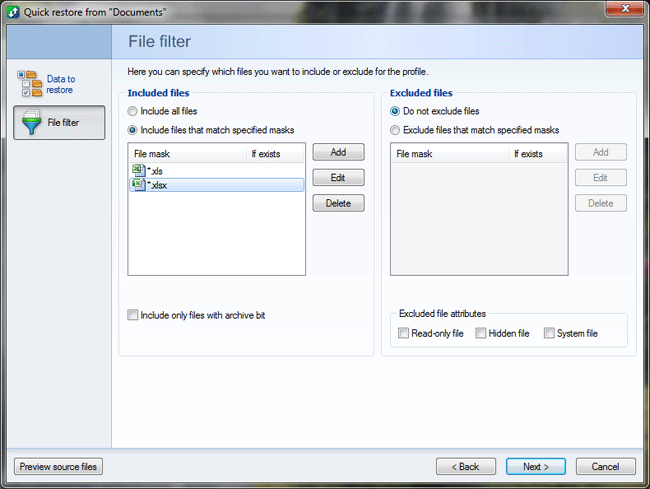
Note there is the difference between the filters and exclusion masks from the previous tab. Filters are applied to files in any folder, exclusion masks are applied only to files from a specific folder and its subfolders.
| Included files | ||||
| Include all files | This option lets you include all files into the synchronization process. | |||
| Include files that match specified masks | This option lets you include only specified file types into the restoration process. | |||
| Include only files with archive bit | This option allows you to include in the restoration process only files with the archive attribute. | |||
| Excluded files | ||||
| Do not exclude files | This option does not exclude any files from the restoration process. The option is checked by default. | |||
| Exclude files that match specified masks | This option lets you specify file types to exclude from the restoration process. | |||
Excluded file attributes
|
This option lets you exclude
files
|
|||
To add a filter, you need to click the Add button. This opens the File Mask Editor.
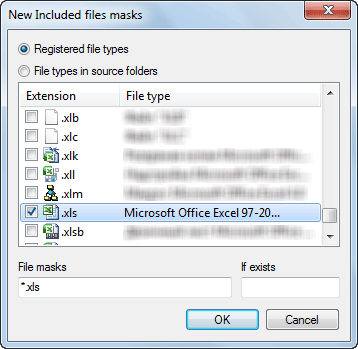
The File Mask Editor lets you select the file type to include (or exclude) into the restoration process. The so-called "If exists" filter specifies a special condition to include or exclude files if there are files with the same name and specified extension in the current folder.
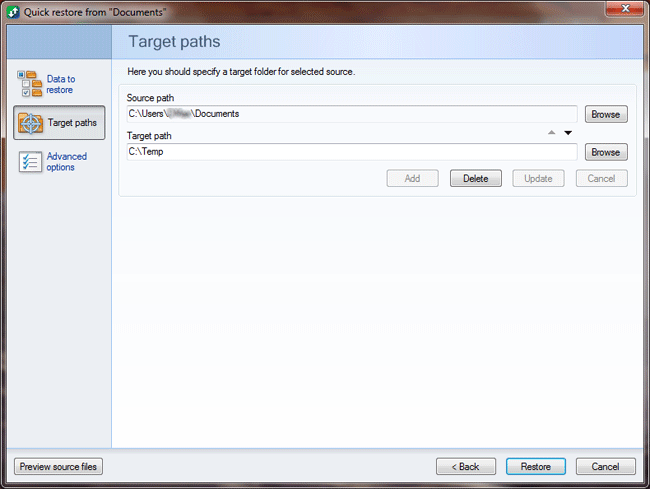
Target paths tab
This tab lets you select the target folder in which the selected files will be restored.
Advanced options tab
This tab allows you to change advanced recovery options.
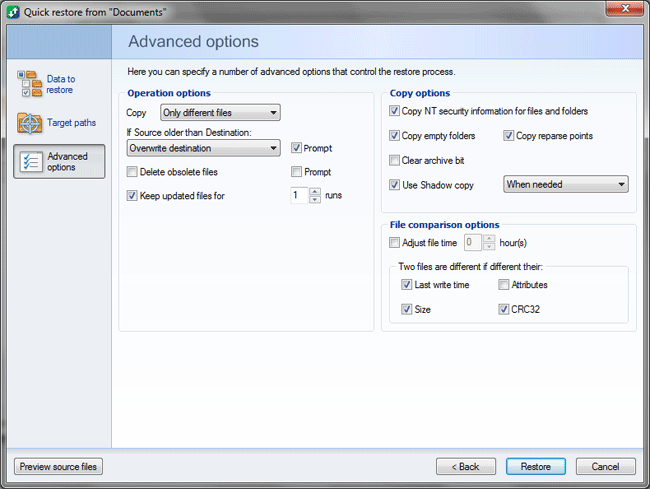
| Operation options | |
| Copy ... | This option lets you copy either all files or only different ones. |
| If Source older than Destination | This option allows you to specify the action to take on files when a recovery conflict occurs (for example when source files are older than files in the destination folder). The program can skip copying, rename destination files, or overwrite destination files. |
| Prompt (for conflict resolution) |
If this option is selected, the program shows the list of processed files when a conflict occurs and waits for the user to select and confirm the method to resolve a conflict. |
| Delete obsolete files | Select this option to delete obsolete files. |
| Prompt (for deletion) |
If this option is selected, the program shows the list of processed files when files to delete are found and waits for the user to confirm their deletion. |
| Keep updated files ... runs | The program allows you to save (and restore) files that have been replaced or deleted during execution. For each launch, the program creates an encrypted internal archive that stores all changed and deleted files. Here you can specify how many archives of this kind need to be saved. |
| Copy options | |
| Copy NT security information for files and folders | Select to copy file and folder permissions (ACL). |
| Copy empty folders | Select to copy empty folders. |
| Copy reparse points | Select to copy reparse points. |
| Clear archive bit | If it is set, the program removes the archive attribute for processed files. |
| Use Shadow copy | Select to use Shadow copy service. Shadow copy lets you copy files that are locked by other programs and ensures integrity of copied data (for data of a program which is compatible with this service). If you select When needed, then the Shadow copy is created only if a locked file is found during the execution of a profile. |
| File comparison options | |
| Adjust file time ... hour(s) | Use this option to compare files between computers in different time zones and adjust file time. |
| Two files are different if different their ... | Select the criteria to determine different files. Files are different if different their last write time or attributes or size or CRC32. |