Profile editor
@MAX SyncUp provides the profile editor to change profile settings.
You can run the profile editor for the selected profile
by clicking the Edit profile  on
the toolbar or by selecting the menu command Edit
profile in the main window.
The Profile editor window consists of several tabs:
In addition, it contains a few common buttons.
| OK | Saves the changes and closes the profile editor. |
| Cancel | Cancels the changes and closes the editor window. |
| Apply | Saves the changes. |
| Preview source files | Opens the Source file preview window. |
General options tab
This tab allows you to edit general settings of a profile, such as a profile name, location and other storage options.
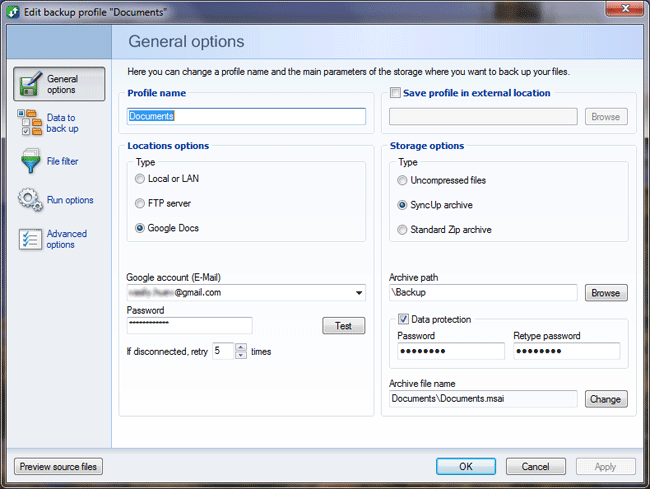
| Profile name | The field lets you change a profile name. |
| Save profile in external location | Check the box to select an external folder for saving a profile. |
| Location options | |
Type
|
Select the required type of location and then configure its parameters. |
| Connect to LAN resources as | Check the box if you want to connect to local network resources with specific credentials. This option is required to access the network if the profile runs under system account. |
| User name, Password | Enter a user name and password to connect to a network. |
| Disconnect previous connections | Check the box to disconnect connections established earlier. |
| Connect | Click the button to connect to the network using the specified username and password now. It is useful to validate the credentials. |
| FTP host, Port, Login, Password |
FTP connection parameters. |
| Google account (E-Mail), Password | Credentials for access to Google Drive. |
| If disconnected, retry ... times | The number of reconnection attempts. |
| Test | Click to verify connection. |
| Storage options | |
Type
|
Select the type of file storage.
There are three options to choose:
|
| Archive path | Specify the path of the archive. |
| Archive file name | If the profile type is backup, here is a template for the name of the archive. The full path to the archive file is formed as the Archive path + Archive file name. Otherwise, here is the full path to the archive file. |
| Data protection Password |
Check the box and set the password, if you want to specify encryption for the archive. |
Select source tab
This tab lets you select files and folders to be processed during the profile execution.
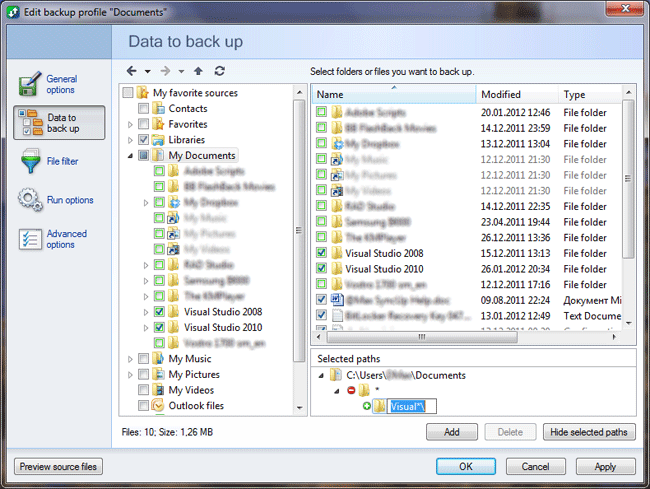
The tab consists of three areas: folder tree, file viewer and the area that displays a full path of selected folders and files.
My Favorite Sources folder lets you select typical sets of files with a click. For example, you can quickly select Outlook files, Windows Mail files, Documents, etc.
The Add and Delete buttons allow
you to add and delete the so-called exclusion
masks for every selected path.
Let's say, for example, you need to back up contents
of the Documents folder, but you do not need
to back up any subfolders except Visual Studio
2005 and Visual Studio 2008.
So, first select the folder Documents in the
tree. Next, click Add and enter "*\" into
the appearing input box to exclude any folder. Then
click the Add button again and enter the "Visual*\" to
include folders with names that start with Visual.
That's all. Exclusion masks give you real flexibility
in selecting files for processing.
Target paths tab
This tab lets you select the target path of each source folder.
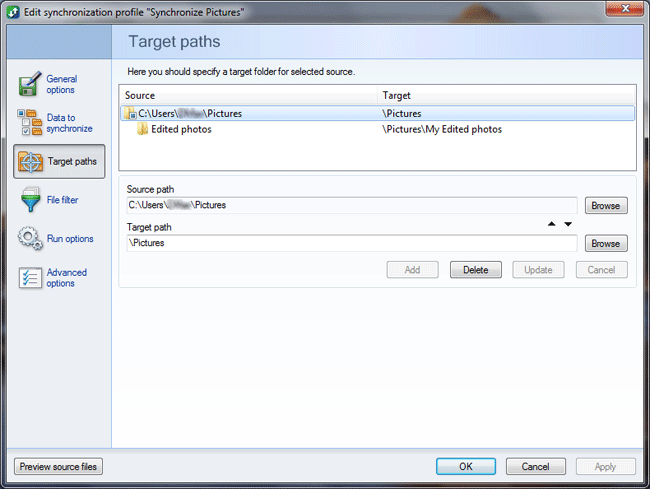
Also, you can redirect a source sub-folder to any target folder. Let's say, for example, you synchronize the folder Pictures on your personal laptop and the server of your company, and you want to synchronize the contents of the subfolder Edited photos on the laptop with a folder My Edited Photos on the company server. For this, enter path for the Edited photos into the Source path field, then enter path for the My edited photos on the server into the Target path field, and then click Add. That's all. Now the folder Edited photos on the laptop will be synchronized with the folder My Edited Photos on the server.
File filter tab
This tab lets you edit filters for including or excluding specific file types to be processed during the profile execution.
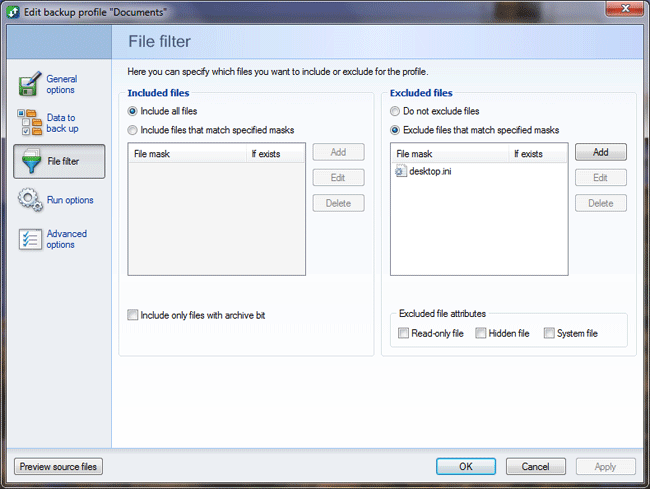
Note there is the difference between the filters and exclusion masks from the previous tab. Filters are applied to files in any folder, exclusion masks are applied only to files from a specific folder and its subfolders.
| Included files | ||||
| Include all files | This option lets you include all files into the synchronization process. | |||
| Include files that match specified masks | This option lets you include only specified file types into the synchronization process. | |||
| Include only files with archive bit | This option allows you to include in the synchronization process only files with the archive attribute. | |||
| Excluded files | ||||
| Do not exclude files | This option does not exclude any files from synchronization. The option is checked by default. | |||
| Exclude files that match specified masks | This option lets you specify file types to exclude from the synchronization process. | |||
Excluded file attributes
|
This option lets you exclude
files
|
|||
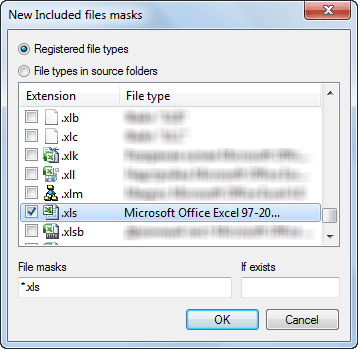
To add a filter, you need to click the Add button. This opens the File Mask Editor.
The File Mask Editor lets you select the file type to include (or exclude) into the synchronization profile. The so-called "If exists" filter specifies a special condition to include or exclude files if there are files with the same name and specified extension in the current folder.
Run options tab
This tab lets you edit run options for the synchronization process.
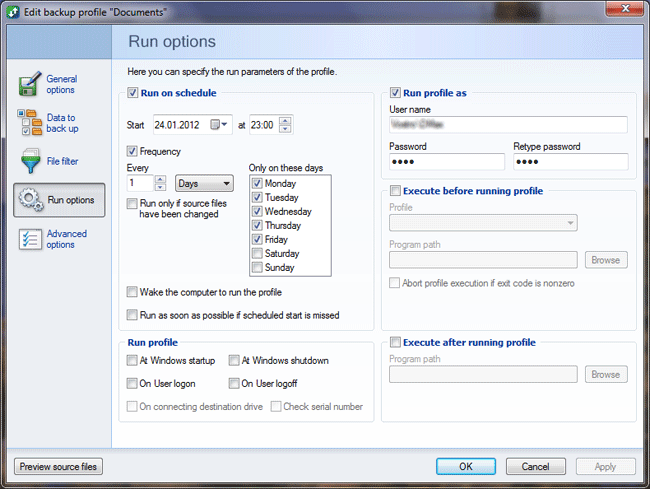
| Run on schedule | |
| Start ... at ... | Runs a profile at a specific time on a particular day. |
| Frequency | Check the box if you want to run the profile periodically. |
| Every... | Select the desired time interval for running a profile. |
| Only on these days | Runs a profile on selected days (Monday, Tuesday, Wednesday, etc). |
| Run only if source files have been changed | Select this option to run a scheduled profile only if source files have been modified. |
| Run as soon as possible if scheduled start is missed | This option enables the program to run a profile as soon as possible if the scheduled start time is missed because the computer was shut down, or in the idle mode. If this option is unchecked, missed profiles are not executed. The time after which a profile is considered to be missed is set in the Options dialog. |
| Run profile | |
| At Windows startup | Runs a profile at Windows start. |
| At Windows shutdown | Runs a profile before Windows shutdown. |
| On user logon | Runs a profile when the user logs on Windows. |
| On user logoff | Runs a profile when the user logs off Windows. |
| Connecting destination drive | Runs a profile when the destination drive is connected. |
| Check serial number | This option remembers the serial number of the destination drive and runs a profile only if the serial number of the connected disk matches the serial number of the original drive. Otherwise a profile is run when you connect any disk with the letter similar to the destination drive. |
Run profile asThis option lets you run a profile as a specified Windows user which is helpful for processing files with restricted access, files on encrypted partitions, etc. If the Run profile as option is not selected, the program executes the profile under the System account. |
|
| User name, Password | Enter a user name and password of the user account you want to use to run a profile. If you enter "<Interactive>" instead of user name, the program runs a profile as the user who is currently logged on the system. |
| Execute before running profile | |
| Profile | Select a profile that needs to be executed before running the current profile. |
| Program path | Select a program to run before executing a profile. |
| Abort profile execution if exit code is nonzero | Abort the current profile if a specified program returns a nonzero exit code, or an error occurs while executing the specified profile. |
| Execute after running profile | |
| Program path | Select a program to run after executing a selected profile. |
Advanced options tab
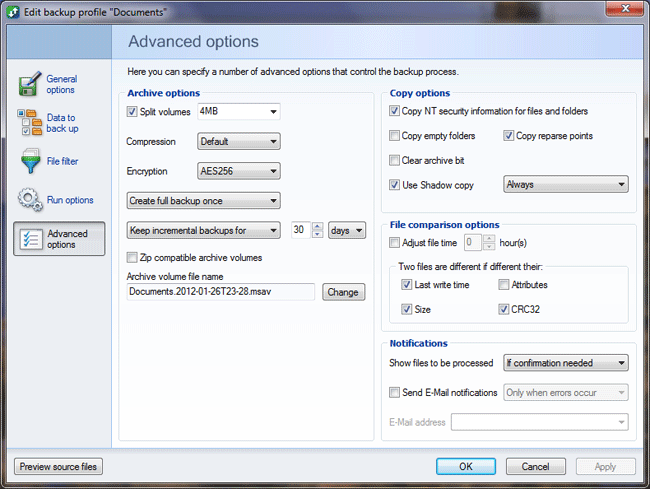
This tab allows you to change advanced options of a profile.
| Operation options | |
| Copy ... | If the profile type is a synchronization profile, this option lets you choose the copy direction: from source to a destination, from the destination to the source, or bidirectionally. Otherwise, this option lets you copy either all files or only different ones. |
| If Source older than Destination / If synchronization conflict occurs |
This option allows you to specify the action to take on files when a synchronization conflict occurs (for example when source files are older than files in the destination folder, or file has been modified in both locations since the last synchronization). The program can skip copying, rename destination files, or overwrite destination or source files. |
| Prompt (for conflict resolution) |
If this option is selected, the program shows the list of processed files when a synchronization conflict occurs and waits for the user to select and confirm the method to resolve a conflict. |
| Delete obsolete files | Select this option to delete obsolete files (files that have been deleted after the last launch of a profile). |
| Prompt (for deletion) |
If this option is selected, the program shows the list of processed files when files to delete are found, and waits for the user to confirm their deletion. |
| Keep updated files ... runs | The program allows you to save (and restore) files that have been replaced or deleted during profile execution. For each launch of a profile, the program creates an encrypted internal archive that stores all changed and deleted files. Here you can specify how many archives of this kind need to be saved. |
| Archive options | |
| Split volumes | This option lets you split an archive into multiple files for recording onto a disk, or other storage. |
| Compression | This option lets you select the required level of compression for processed files. The available options include Default, Maximum, Normal, Fast, Super Fast, None. |
| Encryption | The option lets you select the encryption type: AES128 or AES256. |
| Full backup creation | Configures the creation of a full backup. You can choose from: Never create full backup, Create full backup once, Recreate full backup every .... days or runs. |
| Keeping incremental backups | Sets how long to keep incremental
backups. You can choose from:
|
| Zip compatible archive volumes | Check the box if you want the volumes (full and incremental) to be standard ZIP files. Otherwise, they will have a proprietary format. Note that the Zip does not encrypt the file list, and accordingly does not provide complete security. |
| Archive volume file name | Allows you to set the template for the filename of the archive volumes. |
| Copy options | |
| Copy NT security information for files and folders | Select to copy file and folder permissions (ACL). |
| Copy empty folders | Select to copy empty folders. |
| Copy reparse points | Select to copy reparse points. |
| Clear archive bit | If it is set, the program removes the archive attribute for processed files. |
| Use Shadow copy | Select to use Shadow copy service. Shadow copy lets you copy files that are locked by other programs and ensures integrity of copied data (for data of a program which is compatible with this service). If you select When needed, then the Shadow copy is created only if a locked file is found during the execution of a profile. |
| File comparison options | |
| Adjust file time ... hour(s) | Use this option to compare files between computers in different time zones and adjust file time. |
| Two files are different if different their ... | Select the criteria to determine different files. Files are different if different their last write time or attributes or size or CRC32. |
| Notifications | |
| Show files to be processed ... | Select to show files to be processed if confirmation is needed or always. |
| Send E-Mail notifications ... | Check the box to send email notifications when errors occur, or when profile execution is finished. |
| E-Mail address | Specify an e-mail address to send notifications. |
